The AWS Key Management System can manage FIPS 140-2 Level 3 compliant private keys for Extended Validation (EV) Code Signing Certificates. Using AWS KMS and AWS Fargate for Amazon ECS, you can build a serverless Code Signing Service for Microsoft Windows binary files.
Traditional methods for code-signing often rely on hardware security modules (HSMs) or dedicated on-premises solutions (USB dongle, e.g.), which are costly, difficult to manage, and - of course - do not scale. This article will explain all the relevant steps to build a serverless Code Signing with Extended Validation (EV) on AWS.
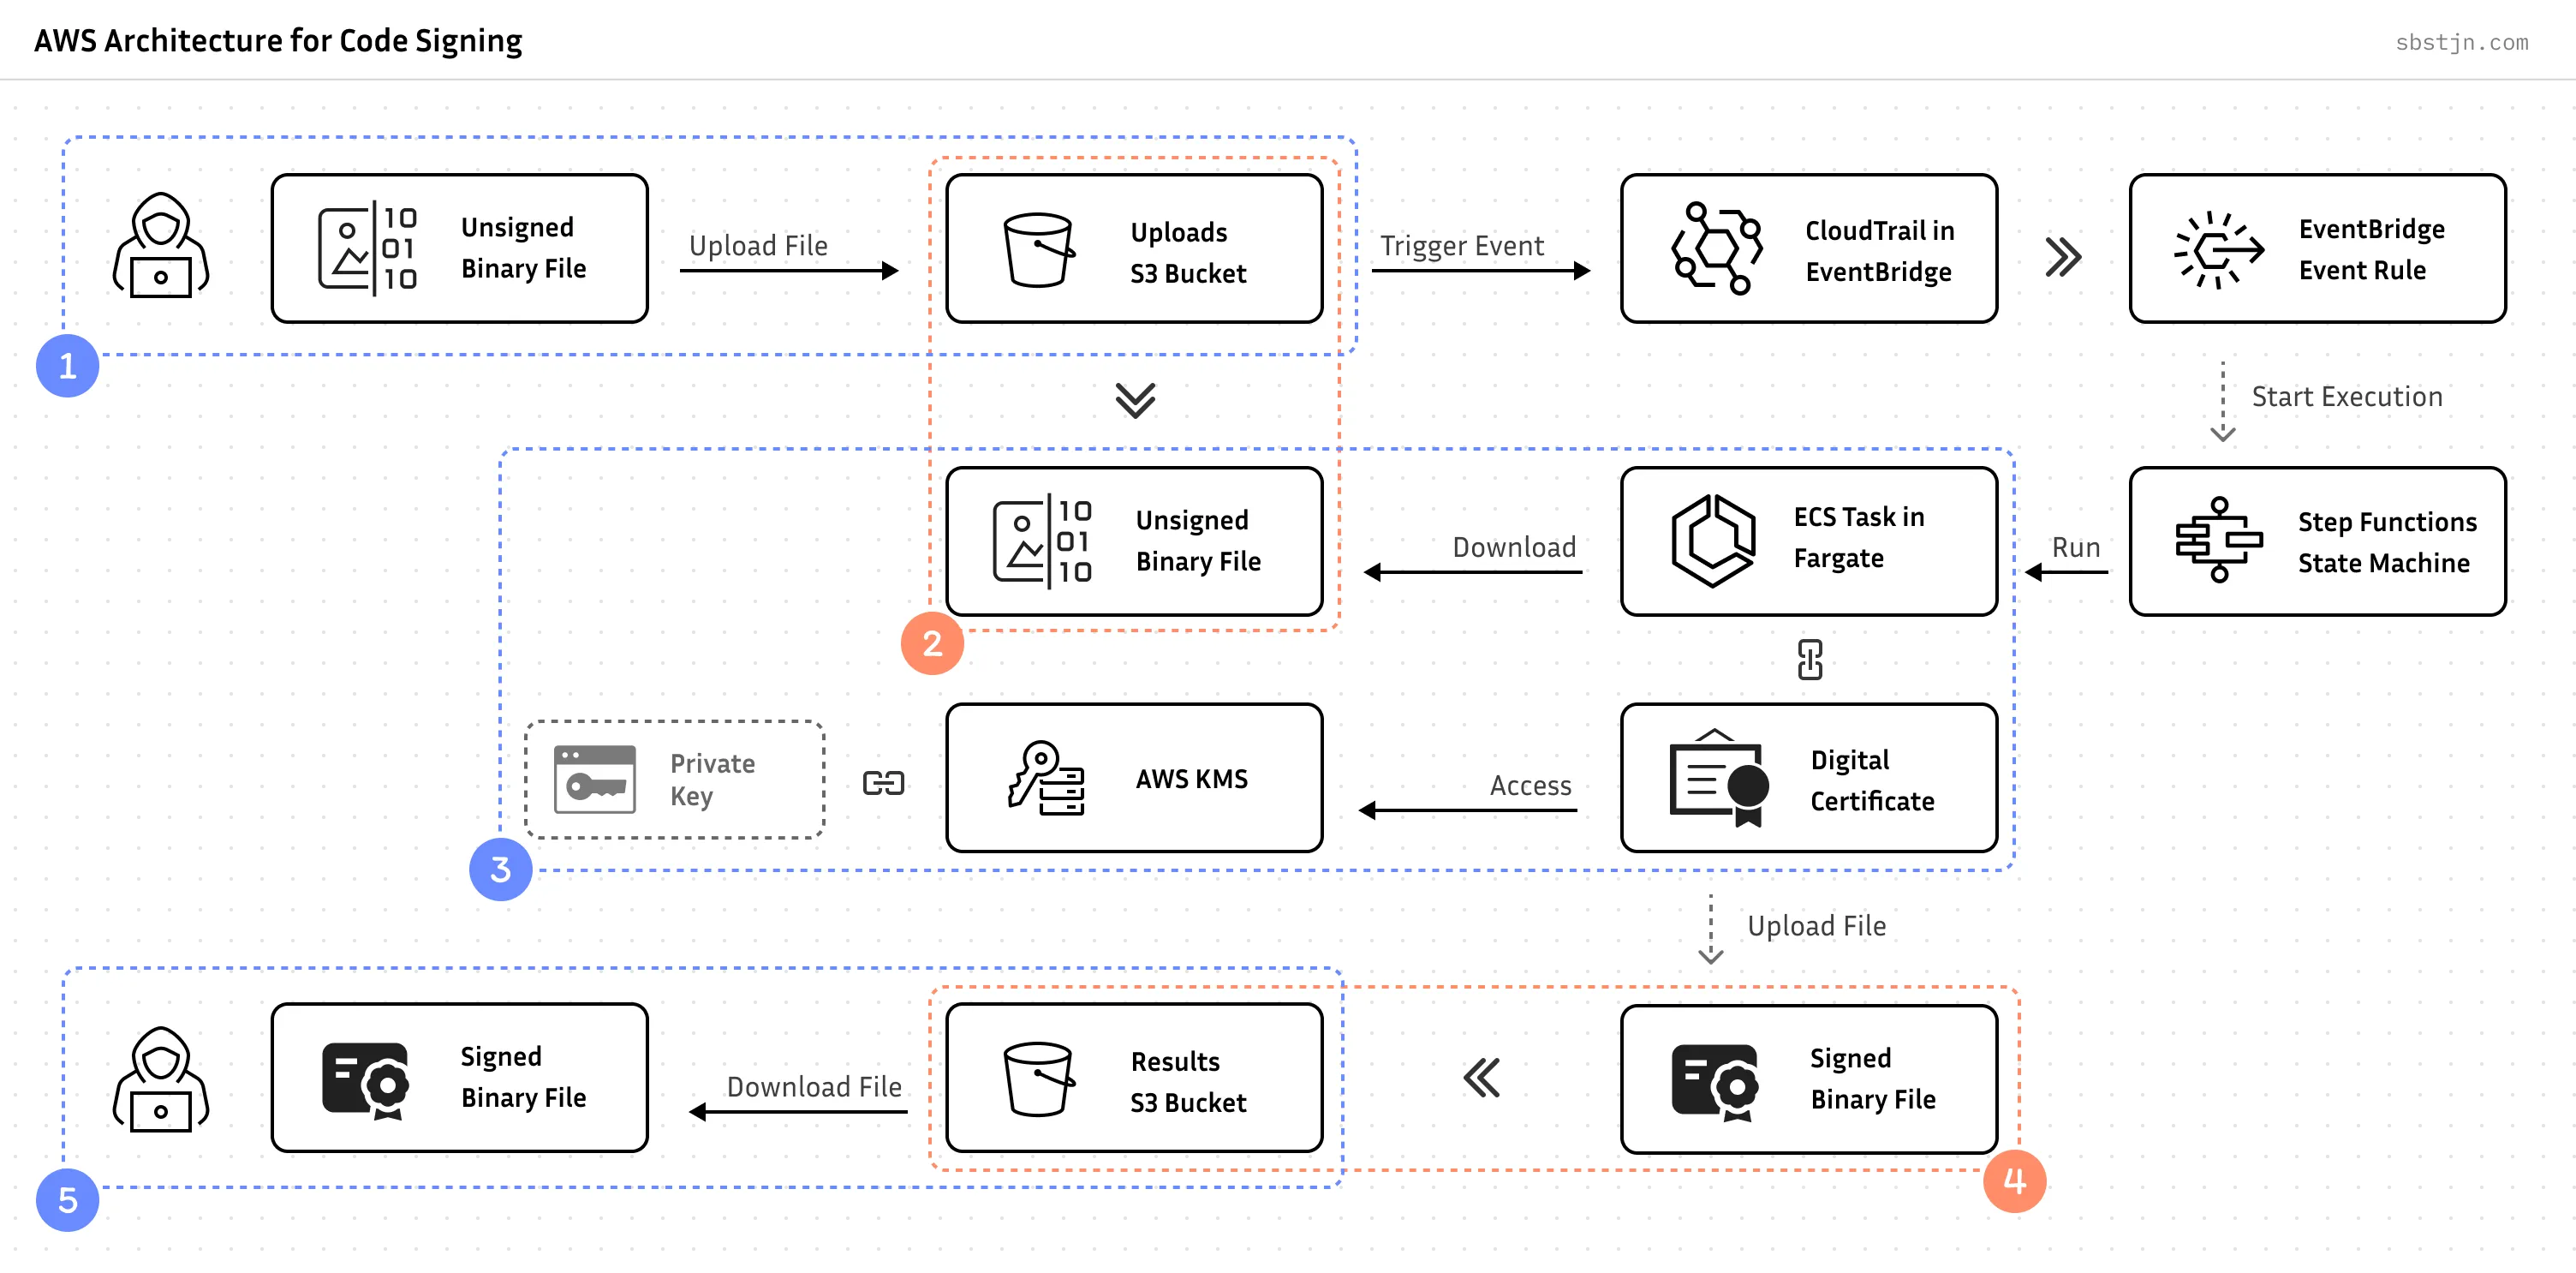
In general, the process of signing a file includes three components: The unsigned file, the private key, and the certificate. When using AWS, this can be mapped to:
- Upload unsigned files to Amazon S3
- Process files based on events
- Access AWS KMS private key for Code Signing
- Store signed files on Amazon S3
- Download signed files
This is a perfect and generic interface for all kind of future integrations; but most importantly: it’s an event-based, serverless, and file agnostic process.
{{< notice >}}
Let’s break this down:
{{< table_of_contents >}}
FIPS 140-2 Level 3 Compliance
To obtain an Extended Validation (EV) Code Signing Certificate, you need to have a private key that is generated and stored in compliance with the already mentioned Federal Information Processing Standard (FIPS) 140-2 at Level 3. This standard, developed by the National Institute of Standards and Technology (NIST), specifies security requirements for the involved cryptographic module:
- Generated within the secure boundary of a validated hardware security module (HSM).
- Never exposed in plaintext outside this secure boundary.
- Protected by strong access controls and authentication mechanisms.
- Backed by physical security measures to prevent tampering.
Of course, AWS CloudHSM is compliant with this. But - fasten your seat belt - as of May 2023, AWS KMS is FIPS 140-2 Security Level 3 certified:
This new certification gives customers assurance that all cryptographic operations involving their keys in AWS KMS happen within an HSM certified at FIPS 140-2 Security Level 3.
Any private key created in AWS Key Management Service is compliant. And all API operations you can use with AWS KMS are compliant:
Now, customers who were using CloudHSM to help meet their compliance obligations for Level 3 validation can use AWS KMS by itself for key generation and usage. Compared to CloudHSM, AWS KMS is typically lower cost and easier to set up and operate as a managed service, and using AWS KMS shifts the responsibility for creating and controlling encryption keys and operating HSMs from the customer to AWS. - AWS Blog.
Of course, storing your private key in AWS KSM is a vendor lock-in. The process of code signing always has constraints: the target platform (Microsoft Windows), a trusted Certificate Authority, and secure storage for the private key. For the last, the choice is between a proprietary hardware device or a trusted cloud provider; AWS e.g..
AWS Key Management Service (KMS) provides scalability for all involved signing operations; on a pay-per-use pricing model. Unlike previous location-bound physical devices, AWS KMS offers accessibility through secure APIs, CLI, and various SDKs.
AWS Key Management Service
To get an Extended Validation (EV) Code Signing Certificate, you need to rely on one of the trusted vendors by Microsoft: Certum, DigiCert, Entrust, GlobalSign, IdenTrust, Sectigo, or SSL.com. In general, you only need to create a Certificate Signing Request (CSR) and submit it to one of the mentioned Certificate Authorities (CA).
With your key in the cloud, this is slightly more tricky. How do you create a CSR with a private key in AWS KMS? When reading about creating this, common guides usually involve commands like openssl and local files; like this:
$ > openssl req \
    -newkey rsa:2048 \
    -keyout PRIVATE.key \
    -out REQUEST.csr
Of course, this does not work with KMS.
To generate a Certificate Signing Request (CSR) file with a remote key on AWS, it helps to understand the file’s content: It contains all the information about the requesting party and the needed certificate; like Common Name (CN), Organization (O), Organizational Unit (OU), Locality (L), State/Province (ST), Country (C), Email Address, and a Digital Signature and the Public Key of the private key.
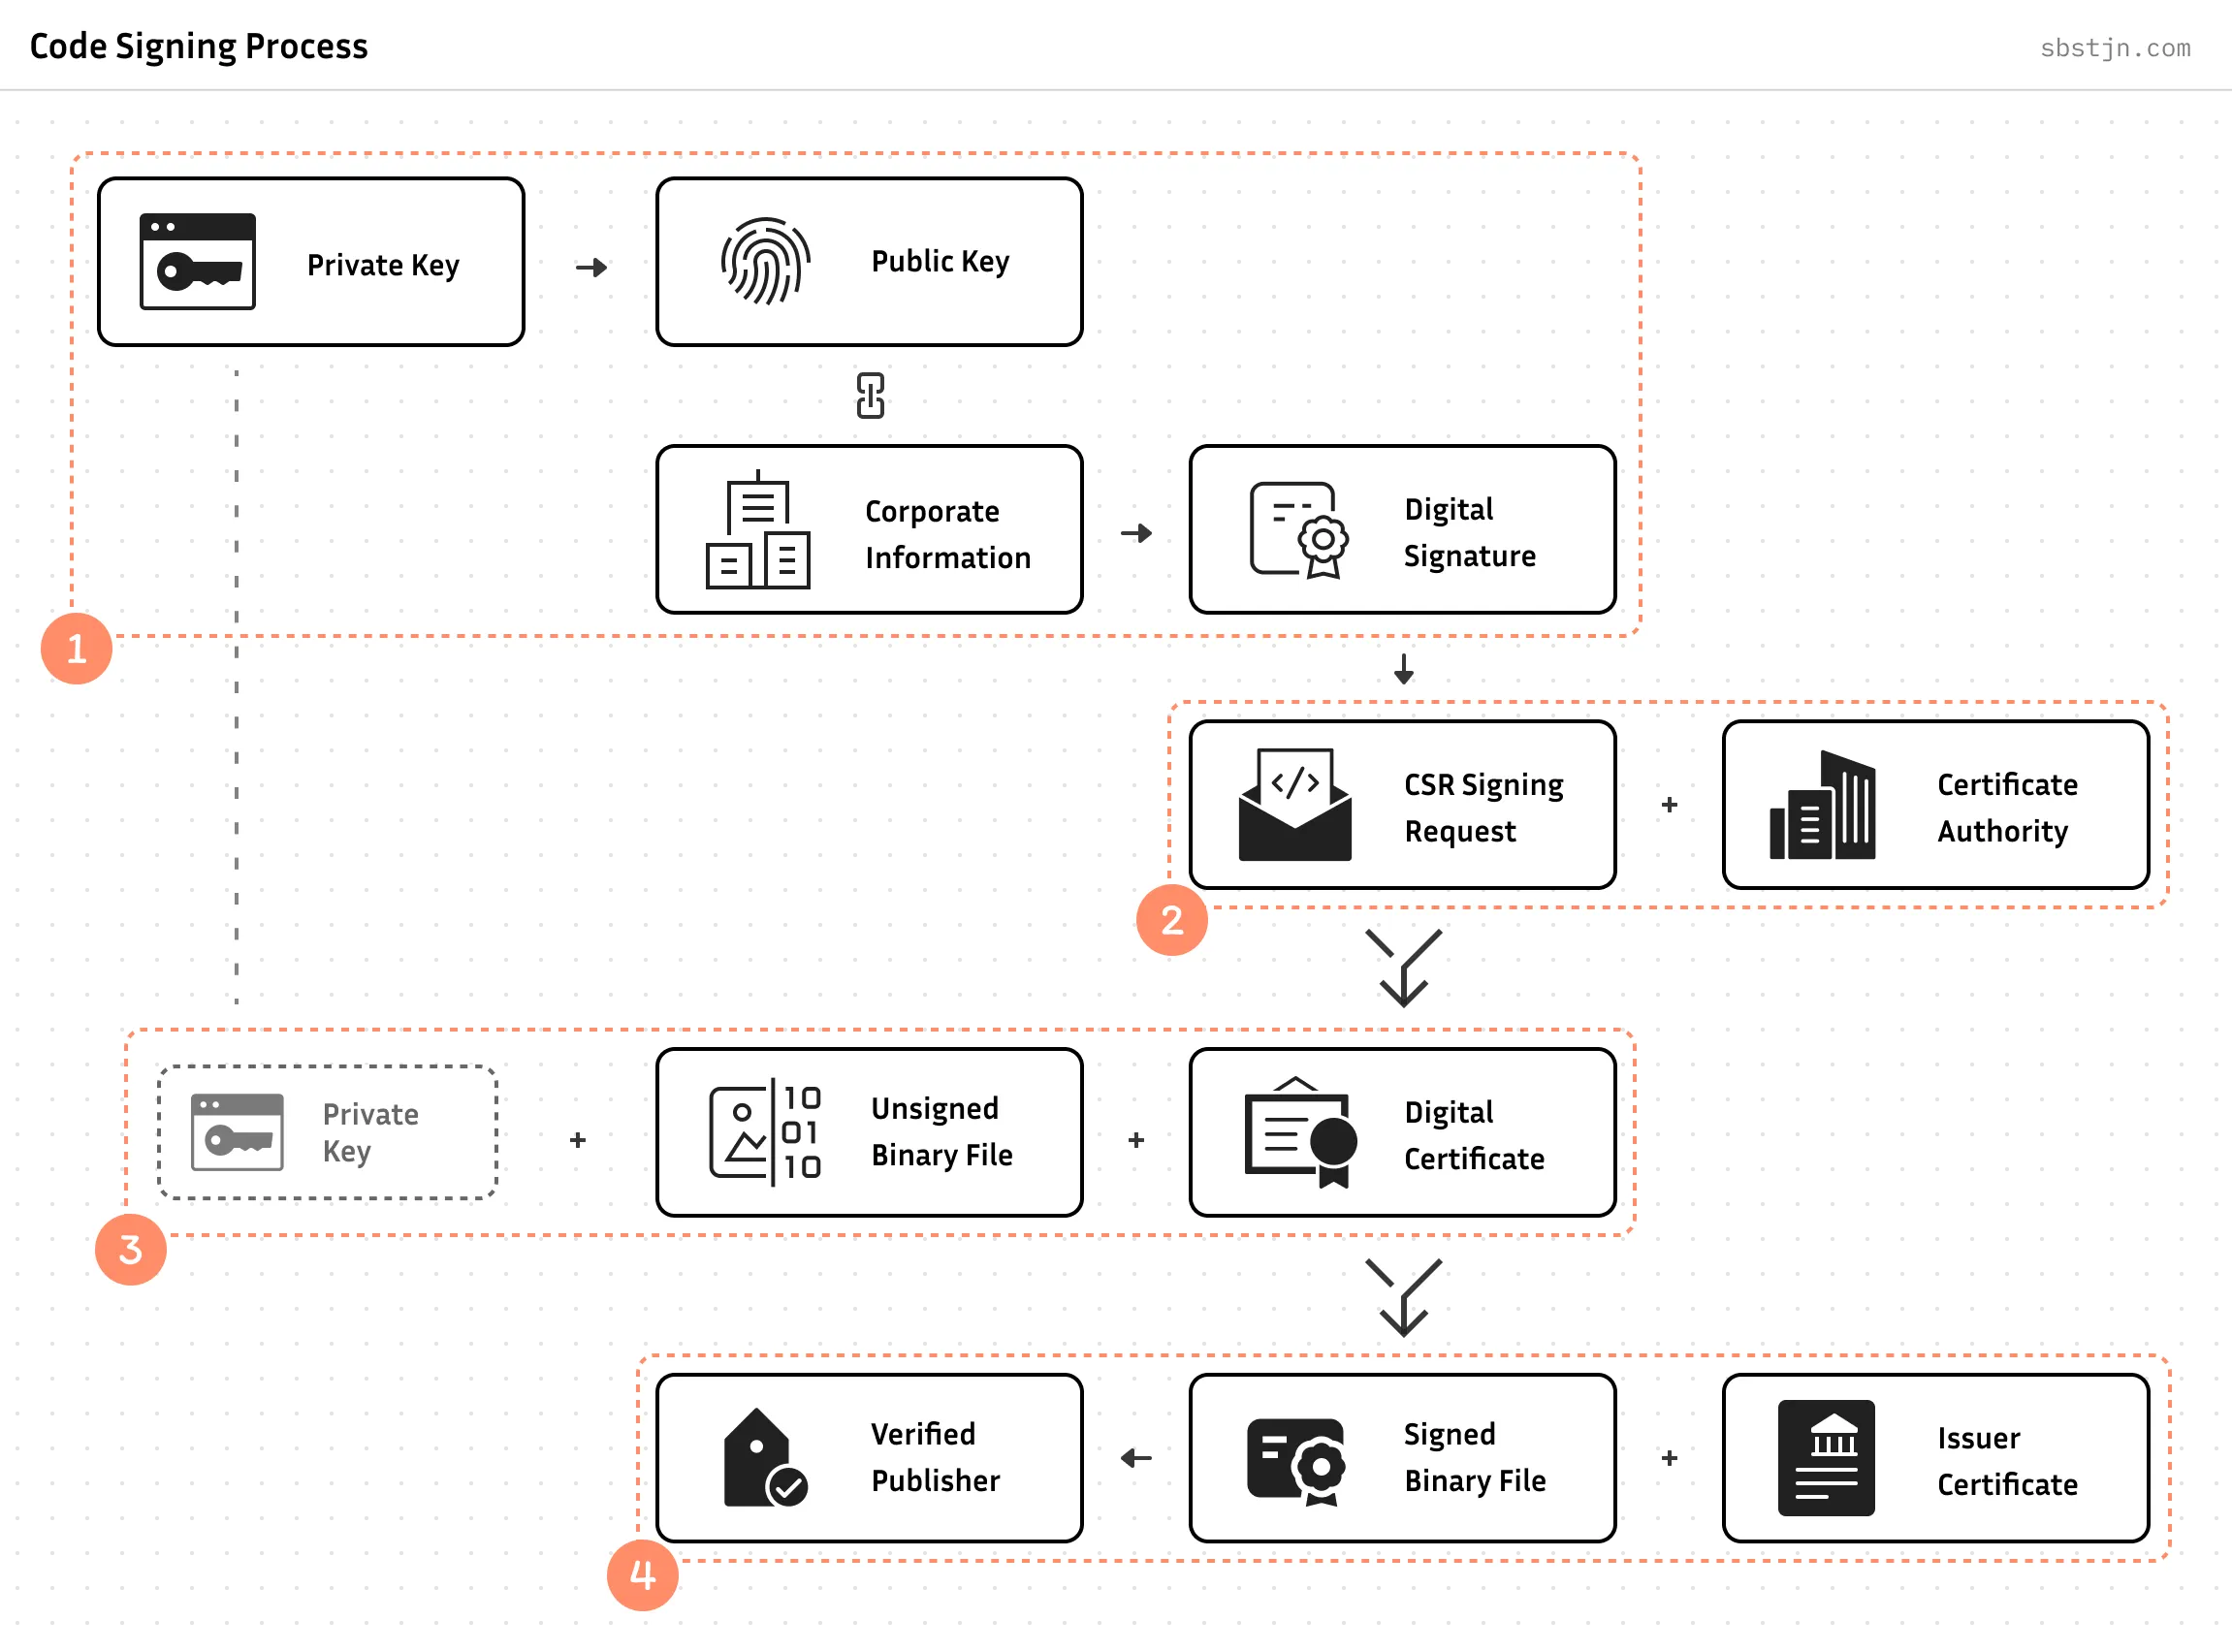
There is no requirement for direct access to the private key when generating a CSR; you only need to have the public key and provide a signature for the included information. This can easily be done with a private key in AWS KMS.
The most simple ways to get a Certificate Signing Request with AWS KMS are:
- Use solutions like csr-signing-using-kms and csr-builder-for-kms, or
- Create a default CSR using a local (disposable) key, and
- Replace used key with AWS KMS (using aws-kms-sign-csr e.g.)
After this, you can contact - for example - GlobalSign and request an Extended Validation (EV) Code Signing Certificate. The Certificate Authority (CA) will then verify the provided information. Additionally, you need to provide technicals details about the involved cryptographic modules and how you ensure compliance with FIPS 140-2 Level 3.
All of this may take some days. But finally, you obtain an Extended Validation (EV) Code Signing Certificate. Together with the private key in AWS KMS you can now sign binary files! With the Issuer Certificates, the identity of the signature can easily be verified.
Code Signing Certificates and KMS
Using the AWS Cloud Development Kit in TypeScript, create a new private key in AWS KMS for signing and verification using RSA and a key size of 4096 bits:
const key = new aws_kms.Key(this, "main", {
  keySpec: aws_kms.KeySpec.RSA_4096,
  keyUsage: aws_kms.KeyUsage.SIGN_VERIFY,
  alias: "code-signing",
  removalPolicy: RemovalPolicy.RETAIN,
});
You can retrieve the corresponding public key with the AWS CLI. More important, you can sign and encrypt data without direct access to the private key.
AWS additionally provides API endpoints using a FIPS-compliant connection. For the AWS CLI, you can set the endpoint with --endpoint-url and for boto SDK integration by setting AWS_USE_FIPS_ENDPOINT environment variable to true .
# Retrieve your public key from KMS

$ > aws kms get-public-key \
    --key-id cdc03311-916c-4d52-be95-3766cf9e2d03 \
    --endpoint-url https://kms-fips.eu-central-1.amazonaws.com

# Create a digital signature

$ > aws kms sign \
    --key-id cdc03311-916c-4d52-be95-3766cf9e2d03 \
    --message fileb://YOUR_FILE \
    --message-type RAW \
    --signing-algorithm RSASSA_PKCS1_V1_5_SHA_256 \
    --endpoint-url https://kms-fips.eu-central-1.amazonaws.com

# Encrypt a local file

$ > aws kms encrypt \
    --key-id cdc03311-916c-4d52-be95-3766cf9e2d03 \
    --plaintext fileb://YOUR_FILE \
    --endpoint-url https://kms-fips.eu-central-1.amazonaws.com
You can create the Certificate Signing Request next. Fortunately, there are existing solutions on GitHub: aws-kms-sign-csr, csr-signing-using-kms, or csr-builder-for-kms.
# Create new CSR and use disposable private key

$ > openssl req -new \
		-newkey rsa:2048 -keyout /dev/null -nodes \
		-out request_temp.csr

# Configure AWS SDK to use FIPS endpoints if needed

$ > export AWS_USE_FIPS_ENDPOINT=true

# Replace signature and public key using AWS KMS

$ > ./aws-kms-sign-csr.py --region eu-central-1 \
		--keyid alias/YOUR_ALIAS_NAME \
		--hashalgo sha256 \
		--signalgo ECDSA \
		request_temp.csr > request.csr
Now you have a Certificate Signing Request with a private key stored in AWS KMS at FIPS 140-2 Level 3. You can submit this to a Certificate Authority (CA) to request a Extended Validation (EV) Code Signing Certificate.
Boom! 🤯 No need to pay for an expensive Cloud HSM!
Sign a Windows Binary File
After you have received the Extended Validation (EV) Code Signing Certificate as a file, you can directly use it for signing Microsoft Windows binary files. On a Linux or Unix system, you could do this using Jsign. For using FIPS-compliant AWS endpoints, you need to use a custom version of the jsign package; a Pull-Request on GitHub is available.
$ > AWS_USE_FIPS_ENDPOINT=true java -jar jsign.jar \
    --storetype AWS \
    --keystore eu-central-1 \
    --storepass "$AWS_ACCESS_KEY_ID|$AWS_SECRET_ACCESS_KEY|$AWS_SESSION_TOKEN" \
    --alias "cdc03311-916c-4d52-be95-3766cf9e2d03" \
    --tsaurl http://timestamp.sectigo.com \
    --certfile certificate.cer \
    unsigned_binary.exe
All it takes is a pair of AWS credentials, a reference to the private key in KMS, the local certificate file and - of course - the unsigned binary.
Verify Signature
To verify a file’s signature, you need to have the issuer’s certificate and all intermediate ones. For Microsoft Windows, these are already installed. For all other scenarios: The Certificate Authority (CA) usually provides them. On a Linux/Unix-based system, you can use osslsigncode to verify the signature of a binary file for Windows:
$ > osslsigncode verify \
    -in ./binary.exe \
    -CAfile ./chain.pem
Storage Components on AWS
Continue with creating the infrastructure with the AWS Cloud Development Kit and add two Amazon S3 Buckets: one for uploading unsigned files, and a second one for storing the signed binaries.
const bucketUploads = new aws_s3.Bucket(this, "uploads", {
  versioned: true,
  eventBridgeEnabled: true,
  enforceSSL: true,
  blockPublicAccess: BlockPublicAccess.BLOCK_ALL,
  minimumTLSVersion: 1.2,
});

const bucketResults = new aws_s3.Bucket(this, "results", {
  versioned: true,
  eventBridgeEnabled: true,
  enforceSSL: true,
  blockPublicAccess: BlockPublicAccess.BLOCK_ALL,
  minimumTLSVersion: 1.2,
});
With the storage components set up, we can now design the file signing process. This involves creating a script that will:
- Download a file from S3
- Execute the necessary commands to sign the downloaded file
- Upload the signed file back to S3
The signing process, including all necessary custom commands and the certificate itself, can be bundled together. Perfect for AWS Fargate for Amazon ECS.
Code Signing in Docker
Docker provides a consistent interface for the signing process. You only need references to the necessary components and credentials with appropriate permissions:
$ > docker run \
    -e AWS_ACCESS_KEY_ID \
    -e AWS_SECRET_ACCESS_KEY \
    -e AWS_SESSION_TOKEN \
    -e BUCKET_UPLOADS=uploads \
    -e BUCKET_RESULTS=results \
    -e FILE=4a6811f3-7f02-4906-b4ee-25d816f534c3 \
    -e KMS_KEY_ID=c59893a0-6225-4c4a-8443-1877655197df
 $(docker build -q .)
To have a re-usable image, you need to install basic components like a Java runtime for using jsign , the aws-cli to access files on S3 and interact with KMS, and osslsigncode for verifying the file’s signature.
FROM alpine:3

# Update and install necessary packages

RUN apk update && \
    apk upgrade && \
    apk add ca-certificates && \
    update-ca-certificates && \
    apk add --update coreutils build-base bash jq cmake openssl-dev curl-dev git aws-cli openjdk11 make curl openssl && \
    rm -rf /var/cache/apk/*

# Install osslsigncode

RUN git clone https://github.com/mtrojnar/osslsigncode.git && \
    cd osslsigncode && \
    mkdir build && \
    cd build && \
    cmake .. && \
    make && \
    make install && \
    rm -rf ./osslsigncode

# Copy local files

COPY . ./

# Run script

CMD ["bash", "handle.sh"]
Place your Extended Validation (EV) Code Signing Certificate as certificate.cer and the intermediate certificates as chain.pem next to this Dockerfile . The handle.sh is a bash script for:
- Download the unsigned file from S3,
- Run
jsignand create a signature, - Use
osslsigncodeto verify the file’s signature, - Upload the signed file to S3, and
- Remove the unsigned file from S3.
As we want to run this on AWS ECS with AWS Fargate and also locally, we need to ensure the credentials are retrieved accordingly. For direct usage, you can pass the credentials as environment variables; when using AWS Fargate, you need to retrieve them.
#!/bin/bash

# Download file from S3

aws s3 cp s3://$BUCKET_UPLOADS/$FILE ./ || exit 1

# Configure jsign credentials from ENV or Fargate

if [ -z "$AWS_EXECUTION_ENV" ]; then
    AWS_AUTH="$AWS_ACCESS_KEY_ID|$AWS_SECRET_ACCESS_KEY|$AWS_SESSION_TOKEN"
else
    AWS_AUTH=$(curl 169.254.170.2$AWS_CONTAINER_CREDENTIALS_RELATIVE_URI | jq '.AccessKeyId+"|"+.SecretAccessKey+"|"+.Token')
fi

if [ "$AWS_AUTH" == "||" ]; then
    echo "Failed to retrieve credentials."
    exit 1
fi

# Sign downloaded file

if ! AWS_USE_FIPS_ENDPOINT=true java -jar jsign.jar \
    --storetype AWS \
    --keystore eu-central-1 \
    --storepass "$AWS_AUTH" \
    --alias "$KMS_KEY_ID" \
    --tsaurl http://timestamp.sectigo.com \
    --certfile certificate.cer $FILE; then
    exit 1
fi

# Verify signature

SIGNATURE_FAILED=$(osslsigncode verify -in ./$FILE -CAfile ./chain.pem | grep -c "Signature verification: failed")
if [ "$SIGNATURE_FAILED" == 1 ]; then
    echo "Failed to verify signature."
    exit 1
fi

# Calculate checksum for signed binary

CHECKSUM=$(openssl dgst -sha256 -binary "$FILE" | openssl base64 -A)

# Upload signed binary to S3

aws s3api put-object \
    --bucket "$BUCKET_RESULTS" \
    --key "$FILE" \
    --body "$FILE" \
    --checksum-algorithm SHA256 \
    --checksum-sha256 "$CHECKSUM" || exit 1

# Delete unsigned binary from S3

aws s3 rm s3://$BUCKET_UPLOADS/$FILE || exit 1
Using this approach, you ensured a common interface and enable two usage scenarios:
- The bash script can easily be used in any comparable environment
- Wrapped with Docker, this can be run in Lambda, AppRunner, Beanstalk, ECS with EC2 or Fargate, or any other custom solution.
Serverless Code Signing on AWS
My favourite service for serverless workloads is AWS Lambda. However, Amazon Fargate offers a stronger isolation between individual executions currently. Each invocation for AWS Lambda runs in its own sandbox environment, which is typically reused for subsequent invocations of the same function. With Fargate, we ensure each task running in its own kernel runtime environment.
ECS Task with Fargate
To run a task with Docker using AWS Fargate for Amazon ECS, you need to have the baseline of an Amazon VPC for the networking infrastructure and create an Amazon ECS Cluster within this.
Additionally, all communication with AWS KMS shall not leave the VPC; a local interface VPC endpoint can be configured for accessing the KMS API. If needed, this also supports KMS_FIPS as service identifier; For Federal Risk and Authorization Management Program (FedRAMP) certifications, this is crucial.
// Create VPC

const vpc = new aws_ec2.Vpc(this, `network`, {
  natGateways: 1,
  maxAzs: 1,
});

// Create interface endpoint in VPC to access KMS service

const endpoint = vpc.addInterfaceEndpoint("endpoint-kms", {
  service: aws_ec2.InterfaceVpcEndpointAwsService.KMS_FIPS,
  privateDnsEnabled: true,
});

// Create ECS Cluster

const cluster = new aws_ecs.Cluster(this, `cluster`, { vpc });

// Create Task Definition

const definition = new aws_ecs.FargateTaskDefinition(this, `definition`, {
  memoryLimitMiB: 2048,
  cpu: 1024,
  runtimePlatform: {
    operatingSystemFamily: aws_ecs.OperatingSystemFamily.LINUX,
  },
});

// Reference Dockerfile

const image = aws_ecs.ContainerImage.fromAsset("./container", {
  ignoreMode: IgnoreMode.DOCKER,
  platform: Platform.LINUX_AMD64,
});

// Add container configuration to Task Definition

definition.addContainer(`container`, {
  image,
  logging: new aws_ecs.AwsLogDriver({
    streamPrefix: "container",
  }),
});
Next, configure the task’s permissions to access S3:
// Grant access to S3 Bucket for uploads: Read & Delete

bucketUploads.grantRead(definition.taskRole);
bucketUploads.grantDelete(definition.taskRole);

// Grant access to S3 Bucket for results: Write

bucketResults.grantWrite(definition.taskRole);
Of course, the ECS Task needs permission to access the private key in KMS:
definition.taskRole.addToPrincipalPolicy(
  new PolicyStatement({
    effect: Effect.ALLOW,
    actions: ["kms:DescribeKey", "kms:Sign"],
    resources: [main.keyArn],
  })
);

definition.taskRole.addToPrincipalPolicy(
  new PolicyStatement({
    effect: Effect.ALLOW,
    actions: ["kms:ListKeys"],
    resources: ["*"],
  })
);
Step Functions and State Machine
To run a new task on the Amazon ECS Cluster, you can use AWS Step Functions; this enables an job-based perspective for the overall process. Using the AWS Cloud Development Kit, you can create a State Machine task to run the ECS Task.
const runTask = new aws_stepfunctions_tasks.EcsRunTask(this, `RunTask`, {
  cluster,
  taskDefinition: definition,
  taskTimeout: aws_stepfunctions.Timeout.duration(Duration.minutes(60)),
  launchTarget: new aws_stepfunctions_tasks.EcsFargateLaunchTarget({
    platformVersion: aws_ecs.FargatePlatformVersion.LATEST,
  }),
  integrationPattern: aws_stepfunctions.IntegrationPattern.RUN_JOB,
  resultPath: "$.RunTask",
  containerOverrides: [
    {
      containerDefinition: definition.defaultContainer!,
      environment: [
        {
          name: "KMS_KEY_ID",
          value: key.keyId,
        },
        {
          name: "FILE",
          value: aws_stepfunctions.JsonPath.stringAt("$.detail.object.key"),
        },
        {
          name: "BUCKET_UPLOADS",
          value: bucketUploads.bucketName,
        },
        {
          name: "BUCKET_RESULTS",
          value: bucketResults.bucketName,
        },
      ],
    },
  ],
});
Next, wrap the definition into a State Machine:
const stateMachine = new aws_stepfunctions.StateMachine(this, `machine`, {
  definition: aws_stepfunctions.Chain.start(runTask),
  timeout: Duration.minutes(5),
  stateMachineName: "code-signing",
  stateMachineType: aws_stepfunctions.StateMachineType.STANDARD,
  tracingEnabled: true,
});
With this setup, you can now trigger new executions of the State Machine through various methods. While the AWS Console provides a manual option, you can also use the AWS CLI, APIs, and SDKs for programmatic control. To fully automate the process, we’ll next connect this workflow to S3 events about new uploads.
S3 Integration with EventBridge
The buckets in Amazon S3 are configured to publish events to Amazon EventBridge for actions within them; this includes events for new objects. Using EventBridge Rules, you can trigger a State Machine execution for every Object Created event:
// Create IAM role for EventBridge integration

const eventRole = new aws_iam.Role(this, "role", {
  assumedBy: new aws_iam.ServicePrincipal("events.amazonaws.com"),
});

// Grant access to execute State Machine for IAM role

stateMachine.grantStartExecution(eventRole);

// Trigger State Machine execution for S3 event

aws_events.Rule(this, "rule", {
  eventPattern: {
    source: ["aws.s3"],
    detailType: ["Object Created"],
    detail: {
      bucket: {
        name: [bucketUploads.bucketName],
      },
    },
  },
  targets: [
    new aws_events_targets.SfnStateMachine(stateMachine, {
      input: aws_events.RuleTargetInput.fromObject({
        detail: aws_events.EventField.fromPath("$.detail"),
      }),
      role: eventRole,
    }),
  ],
});
Finally, upload your file to Amazon S3:
// Upload unsighed file to S3

$ > aws s3 cp example.exe s3://bucket-for-uploads
Wait for the successful State Machine execution.
// Download signed file from S3

$ > aws s3 cp s3://bucket-for-results/example.exe
Finally, download the signed file from S3. Boom! 🏁
What’s Next?
Congratulations! 🎉 You have a serverless Code Signing Service with FIPS 140-2 Level 3 compliant cryptographic keys running on AWS. This enables you to sign Microsoft Windows binary files using an Extended Validation (EV) Code Signing Certificate.
All you need to do is: Upload a file to S3! This is a generic API and an industry standard. Go ahead and build you own custom interface for this. You could wrap this with an Amazon API Gateway and generate pre-signed S3 URLs to upload files e.g.
Considerations and Optimizations
To restrict access to AWS Key Management Service and the keys within, you can use Service Control Policies. For example, you can deny all requests not using the created FIPS-compliant VPC interface endpoint:
{
  "Version": "2012-10-17",
  "Statement": [
    {
      "Sid": "NoAccessWithoutFIPS",
      "Effect": "Deny",
      "Action": ["kms:*"],
      "Resource": ["arn:aws:kms:eu-central-1:ACCOUNT_ID:key/YOUR_KEY"],
      "Condition": {
        "StringNotEquals": {
          "aws:SourceVpce": "YOUR_VPC_ENTPOINT"
        }
      }
    }
  ]
}
In addition to FIPS 140-2 Level 3 compliant private key ins AWS KMS, AWS Fargate can enable you to even run whole workloads on Fargate in a manner that is compliant with FIPS-140. So far, this is only available in the AWS GovCloud (US) Regions …
Further Enhancements
To monitor the relevance of the service, AWS exposed a list of relevant metrics about every involved component:
- Amazon S3: Number of objects & requests, 4xx & 5xx errors
- ECS with Fargate: CPU & memory utilization, running task count, network Rx & Tx bytes
- Step Functions: Executions started, succeeded, and failed
- AWS KMS: Key usages
On top of these already existing metrics, custom metrics for relevant KPIs may include the average duration for signing requests.
Using AWS CloudTrail, you can audit all relevant API actions involved in the signing process and the AWS components:
- S3 Events: PutObject, GetObject, DeleteObject
- KMS Events: Sign, GetPublicKey, DisableKey, ListKeys
- ECS/Fargate Events: RunTask, StopTask, DescribeTasks
- Step Functions Events: StartExecution, StopExecution
For the data stored in Amazon S3 buckets: implementing lifecycle configurations to optimise storage management and costs can be a future improvement.
Thanks to the serverless components on AWS and their pay-per-use pricing models, the overall operational costs are bound to the service’s usage:
- Storage: Costs for data stored in buckets
- Requests: Costs for upload, download, and delete requests
- Data transfer: Charges for data transferred out of S3
Additional relevant factors for costs:
- Certificate: Yearly charge for EV Code Signing Certificate
- Key Management: Monthly rate for storing keys, charges for cryptographic operations
- Fargate and ECS: Per-second billing for vCPU and memory
- Processing: Data transfer, CloudWatch logs & metrics, and State Machine executions
All sources are released using the MIT License.