React is great for creating websites and writing applications using JavaScript. But, whenever the use of React is rejected, one of the most common reasons is the lack of a simple implementation for server-side rendering (SSR). When you search on Google for this topic, you’ll find various approaches and most of the time, people will tell you it’s complicated. But Why?
On GitHub, I published cra-serverless to showcase an approach to build your own pre-rendering for an unejected React application built with create-react-app. With AWS Lambda, Amazon CloudFront, and Amazon S3, you can host a static React SPA, have serverless pre-rendering, and enjoy the safety of having pay-per-use services.

It may sound strange to use AWS Lambda for this in the beginning, but in the end, all you have to do is handling events that have a path parameter and respond with the generate HTML code. That’s what web servers usually do! Plus, they take care of all the things that you do not want to think about anyway. Like SSL handling, load balancing and auto-scaling, or content encoding and setting cache headers.
If you want to skip all the explanation and ideas behind this concept, just head over to GitHub and have a look at the repository. The result of cra-serverless looks like this: d31tuk9nqnnpkk.cloudfront.net
Frameworks And Dependencies
When you start a new project using React, chances are high you will end up using create-react-app. For styling, you might go for styled-components and your API communication could rely on GraphQL using AWS AppSync. All of them work fine if you implement them for running in a web browser. But did you know, and please fasten your seatbelts, all of them work totally fine with server-side rendering!?
All needed features are already in the core React packages. No additional framework is needed to render React components to static HTML code. Even styled-components already has all the needed functions to extract CSS rules. A few months ago, I already published an example project on GitHub about server-side rendering with React. With cra-serverless, those approaches are bundled into a full-featured example architecture using AWS.
Basic Theory And Routing
Most React applications rely on the react-router-dom package to handle navigation in the web browser. Yours does this too, right? Nice! Somewhere in your application, there is a BrowserRouter component:
import React from "react";
import { BrowserRouter } from "react-router-dom";

React.render(
  <BrowserRouter>
    <App />
  </BrowserRouter>,
  document.getElementById("root")
);
To build a serverless pre-rendering service, use the same implementation but use the StaticRouter instead and provide a location property. If you keep up with the common best-practices for React, your code will most-likely already be compatible without any additional changes needed.
import { renderToString } from "react-dom/server";
import { StaticRouter } from "react-router-dom";

const markup = renderToString(
  <StaticRouter location={path}>
    <App />
  </StaticRouter>
);
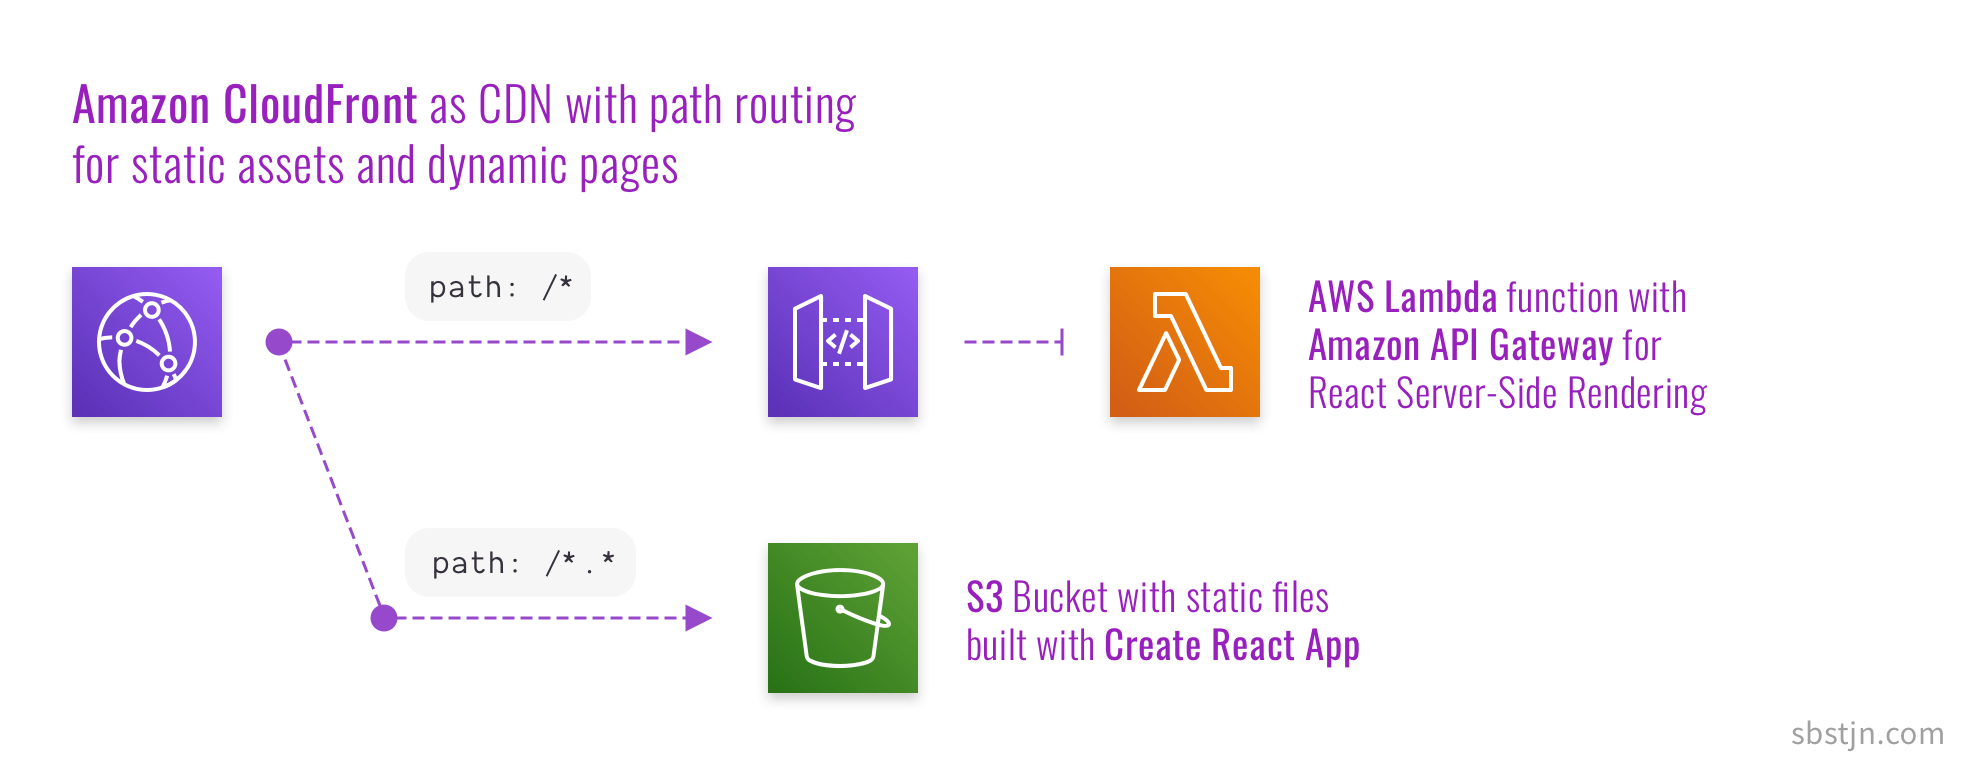
When using Amazon API Gateway, you have scalable HTTP services at hand and you do not need to think about serving HTTP requests at all. Just pass the payload to your HTML renderer or respond with already cached data. The same is true for Amazon S3 when hosting static files and assets.
The missing piece of the puzzle is a service for routing static assets and dynamically pre-rendered HTML code. Amazon CloudFront can do this!
Things Get Real
If you use create-react-app you end up with a simple index.html file after running the yarn build command. To enable server-side rendering, you only need to use the generated index.html file and replace the empty body tag with the generated static HTML code of your components after using renderToString.
Next, use some framework to handle events with a path paremeter, like express or the lightweight koa. All compoments together, a solid architecture for serverless pre-rendering with React on AWS Lambda can look like this.
import { readFileSync } from "fs";
import React from "react";
import { renderToString } from "react-dom/server";
import { HelmetData } from "react-helmet";
import { HelmetProvider } from "react-helmet-async";
import { StaticRouter } from "react-router-dom";
import { ServerStyleSheet } from "styled-components";

const html = readFileSync("../build/index.html").toString();

export const render = (Tree: React.ElementType, path: string) => {
  const context = { helmet: {} as HelmetData };
  const sheets = new ServerStyleSheet();

  const markup = renderToString(
    sheets.collectStyles(
      <HelmetProvider context={context}>
        <StaticRouter location={path}>
          <Tree />
        </StaticRouter>
      </HelmetProvider>
    )
  );

  return html
    .replace('<div id="root"></div>', `<div id="root">${markup}</div>`)
    .replace("<title>React App</title>", context.helmet.title.toString())
    .replace("</head>", `${context.helmet.meta.toString()}</head>`)
    .replace("</head>", `${context.helmet.link.toString()}</head>`)
    .replace("</head>", `${sheets.getStyleTags()}</head>`)
    .replace("<body>", `<body ${context.helmet.bodyAttributes.toString()}>`);
};
As you can see, no additional libraries or frameworks are needed. All packages that you already use provide the features to have pre-rendered HTML responses for your application. Next, wrap this code in some kind of HTTP router:
import koa from "koa";
import http from "koa-route";
import serve from "koa-static";

import App from "../src/App";

export const Router = new koa();

Router.use(
  http.get("*", (ctx: koa.Context) => {
    ctx.body = render(App, ctx.request.path);
  })
);
With a dedicated router for HTTP requests, you can spin up a local development server or use the serverless-http package to configure your service to support incoming HTTP requests from Amazon API Gateway.
// AWS Lambda
import serverless from "serverless-http";
import { Router } from "./router";

export const run = serverless(Router);
// Local HTTP server
import { Router } from "./router";

console.log(`🎉 Starting HTTP server at http://localhost:3000`);
Router.listen(3000);
That’s all you need for adding serverless pre-rendering to your existing React application built with create-react-app. As mentioned in the beginning, even frameworks like styled-components or Apollo Client for using GraphQL with AWS AppSync work fine with this approach.
Infrastructure and Deployments
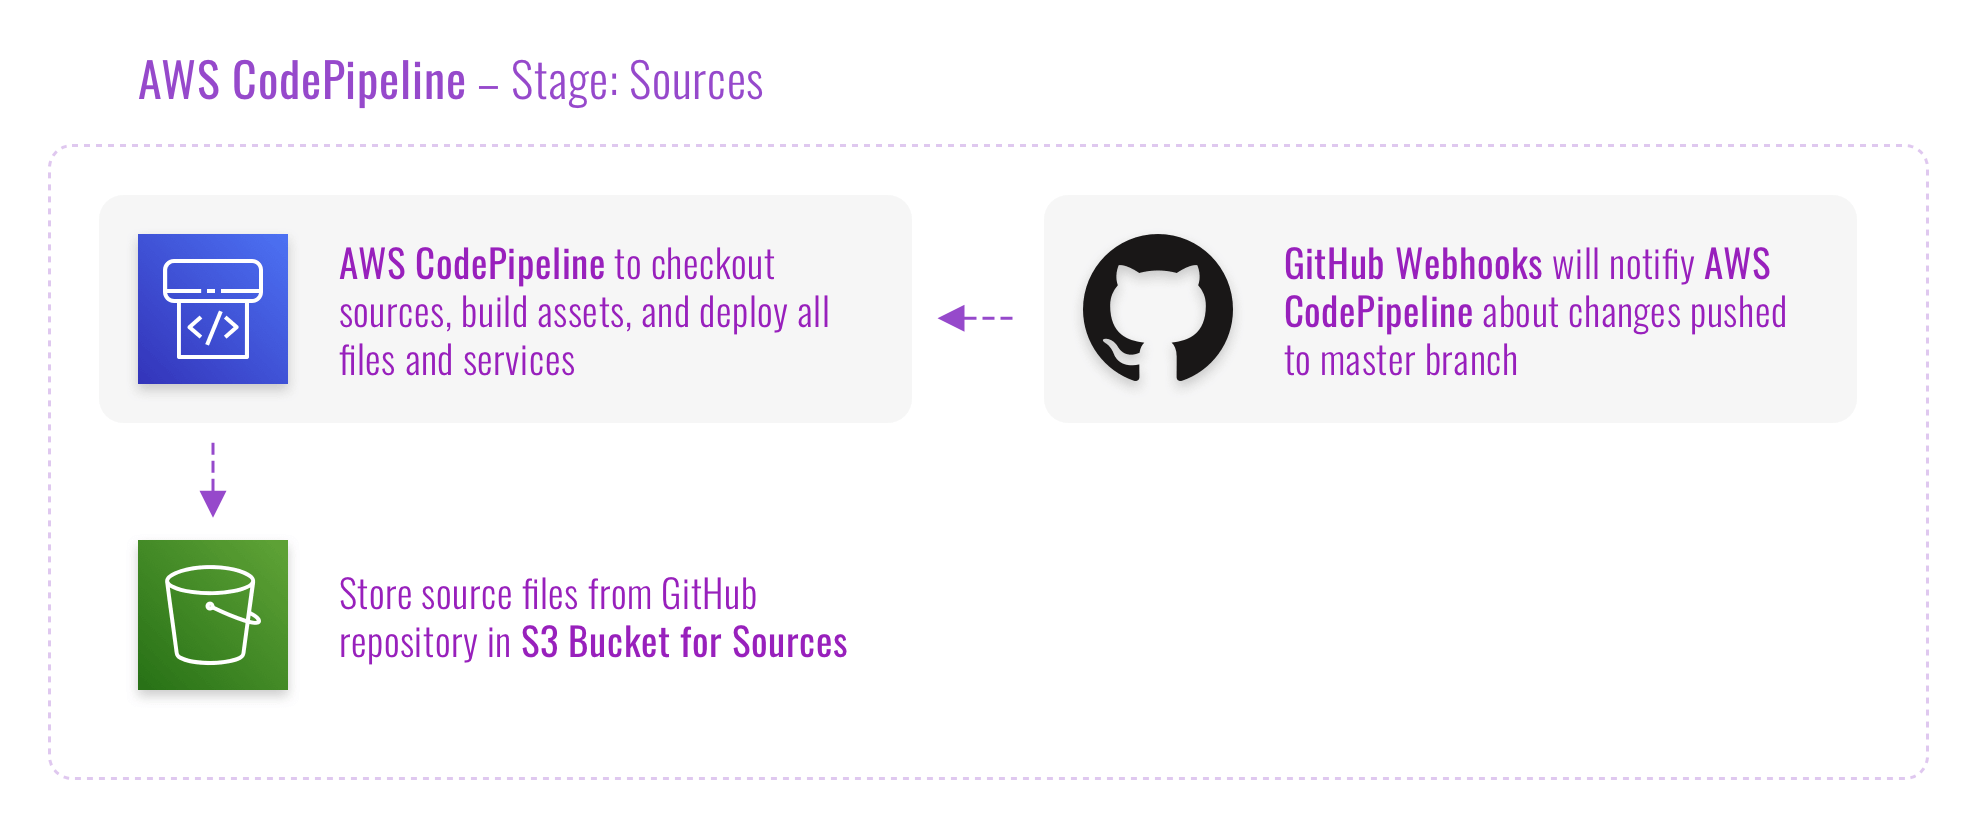
For managing all components of the needed infrastructure, cra-serverless uses the AWS Cloud Development Kit. Using the CDK, you can create resources in AWS using a common programming language, like TypeScript. Together with AWS CodePipeline and AWS CodeBuild you can configure and maintain the whole process of deploying your application in the same GitHub repository. Thanks to GitHub Webhooks you can easily trigger AWS CodePipeline and enjoy a continuous deployment.
A pipeline using AWS CodePipeline consists of multiple Stages, each may contain multiple Actions that either are processed in parallel or sequential order. This first Stage of a pipeline usually is used to download all source files. When the Action for downloading the source files has finished, all files are stored in an S3 Bucket for further processing in one of the following steps.

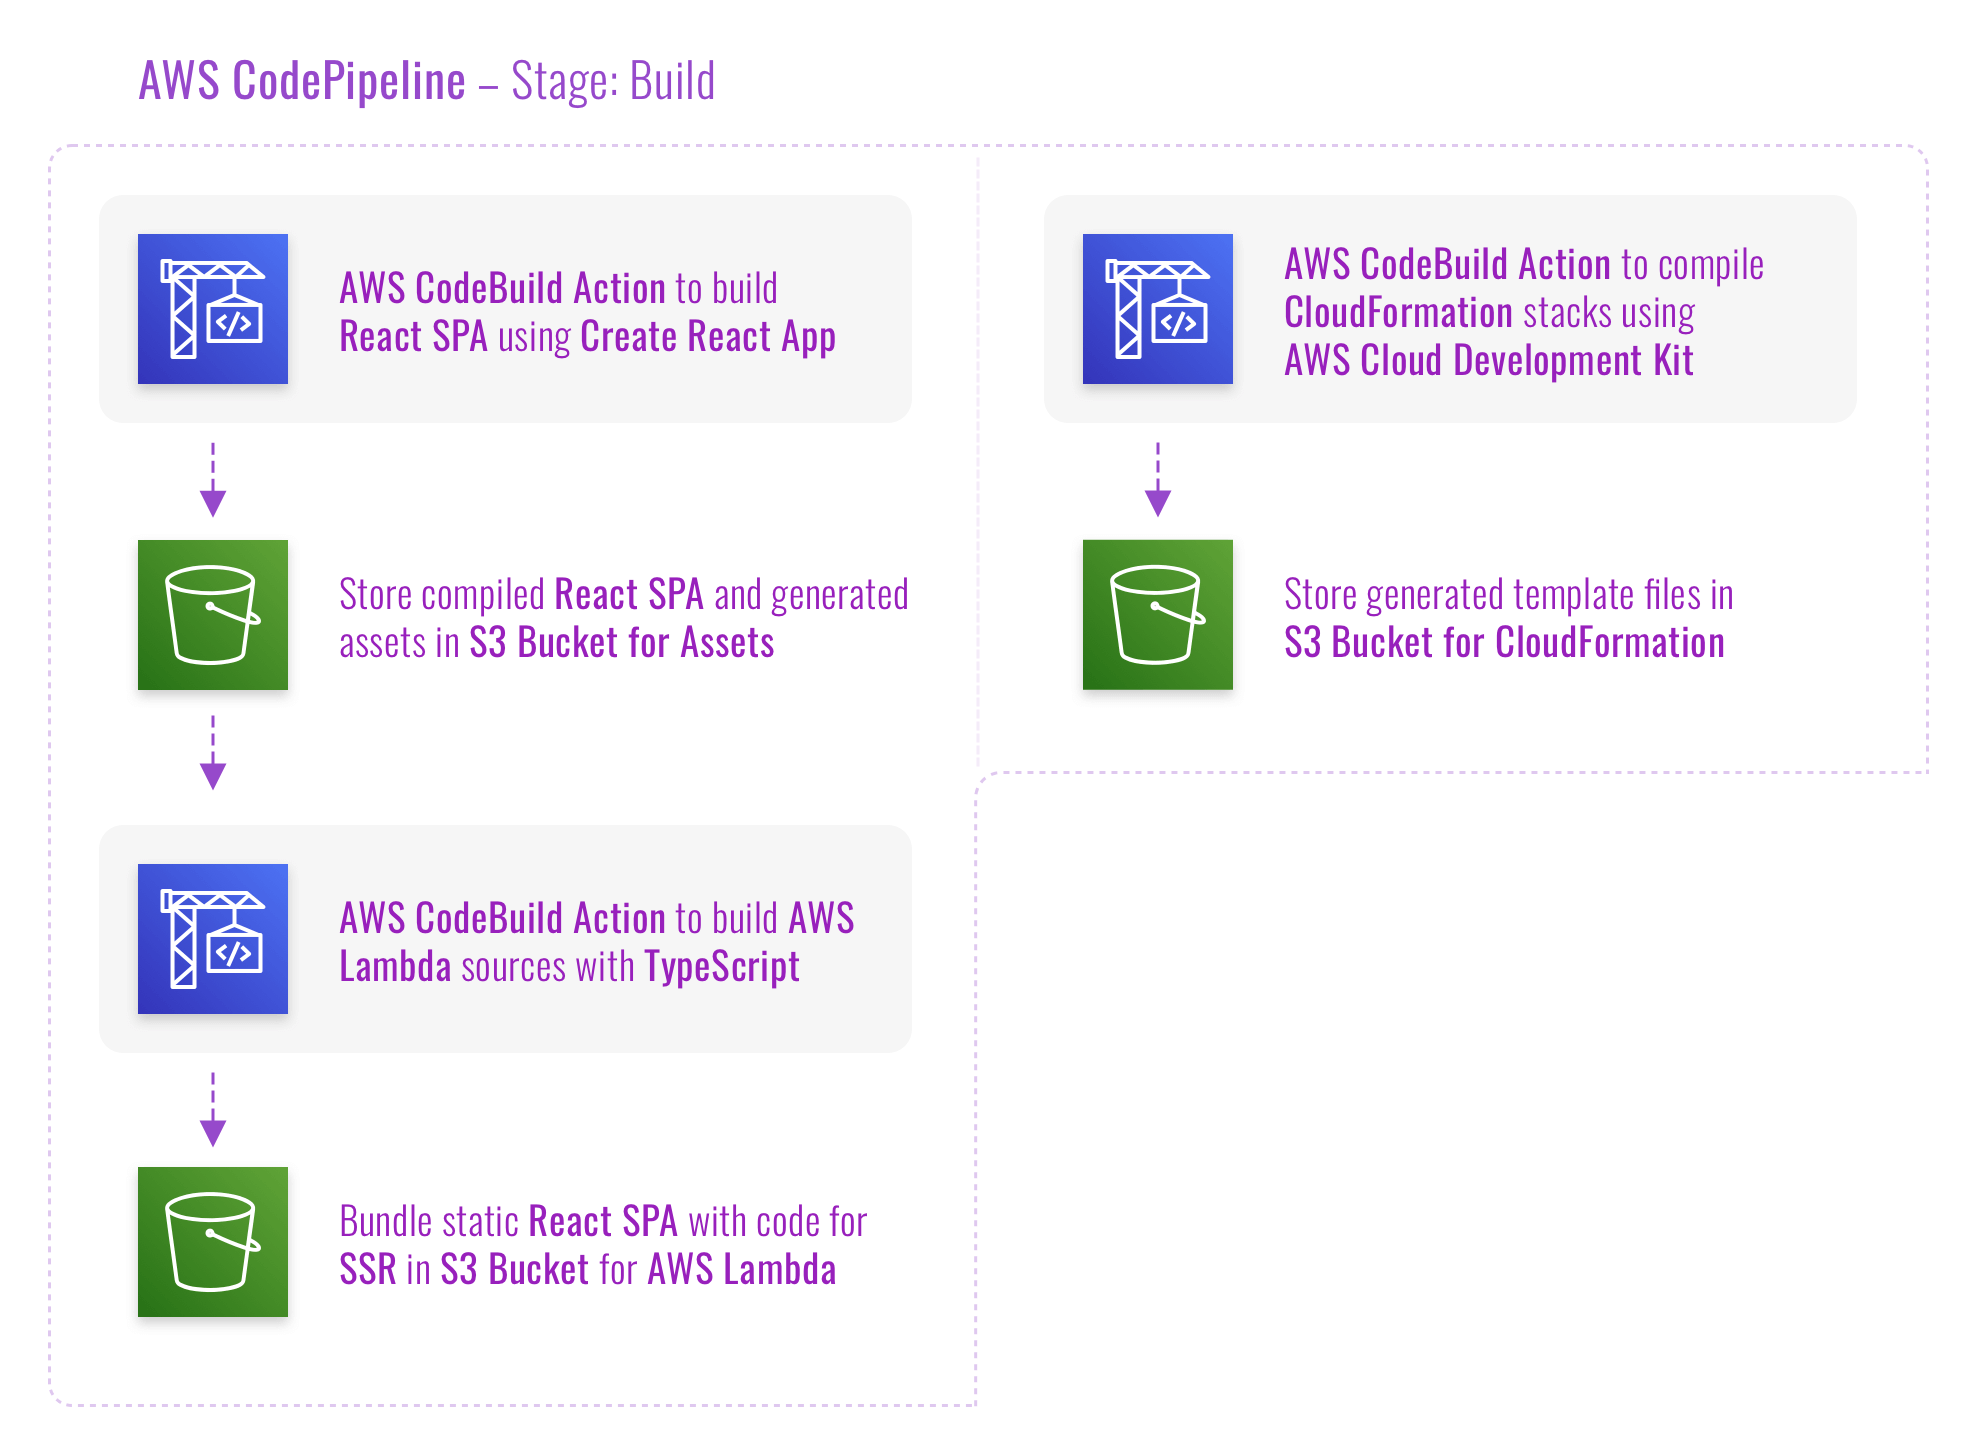
After the sources have been downloaded, the pipeline can start to prepare all the necessary components of the architecture. The configured Actions for the next Stage use
- create-react-app to build all static files for your React SPA,
- TypeScript to compile the sources for the AWS Lambda function,
- AWS Cloud Development Kit to generate CloudFormation templates.
The Actions to build the React SPA and for compiling the sources for AWS Lambda function are handled in sequential order as the static files from create-react-app are needed in the AWS Lambda function. The generation of the needed CloudFormation templates is processed in parallel, as there are no dependencies needed for this task. After each Action has finished, the generated files are stored in S3 again.

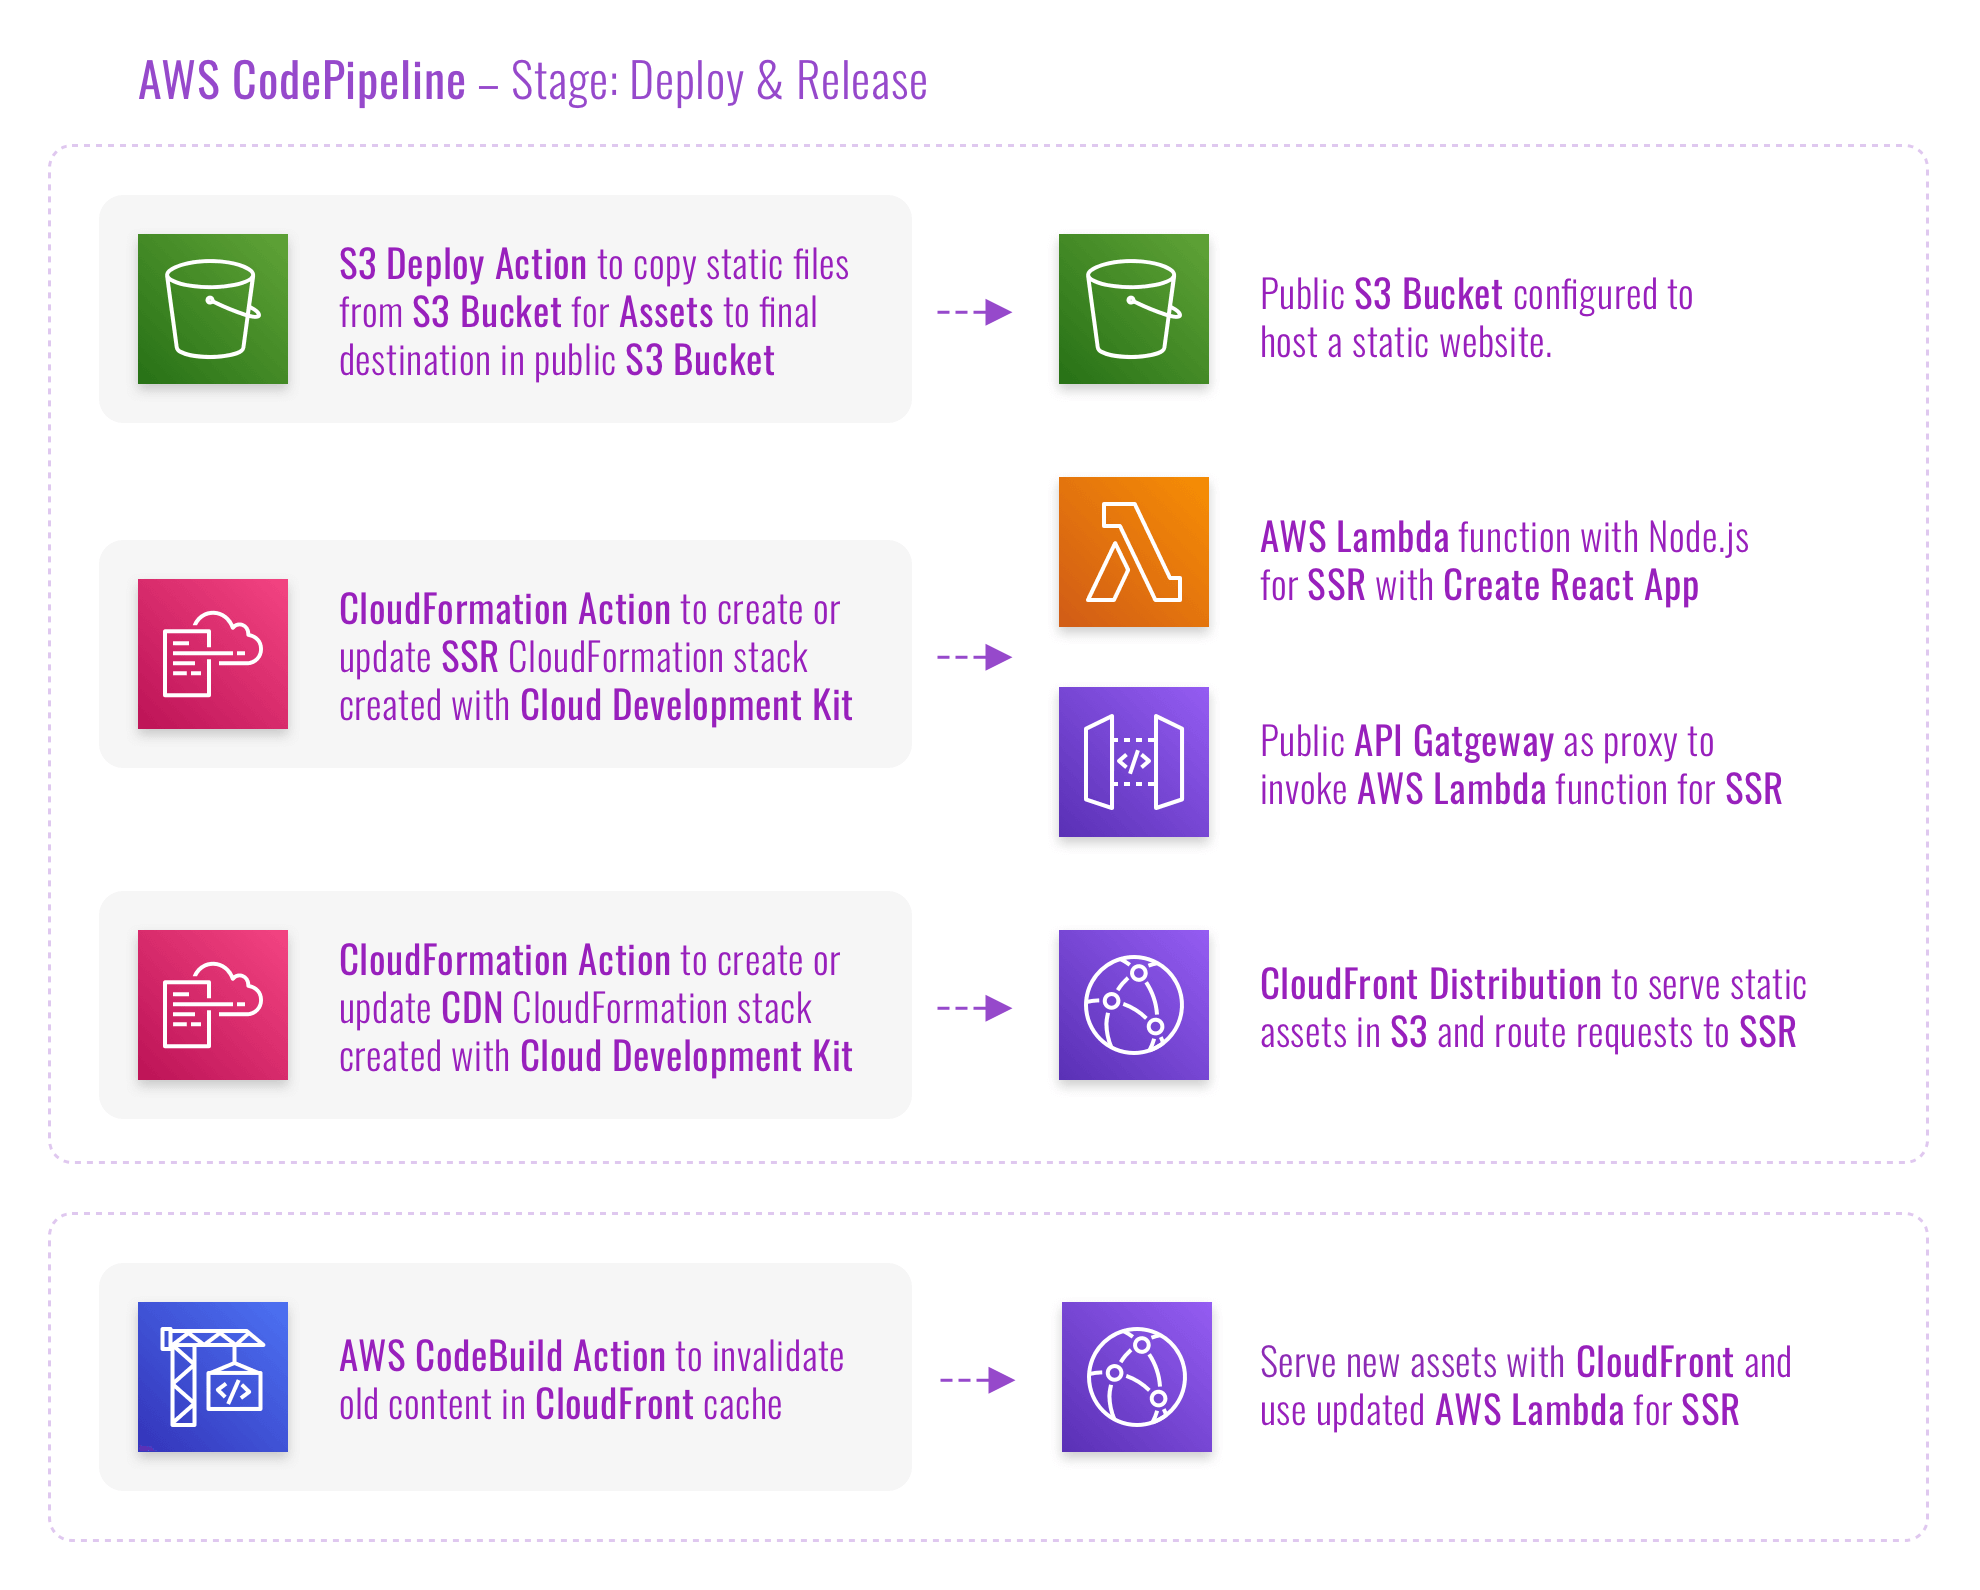
Now, with all sources and generated files available in S3, it’s time to deploy everything to its final destination! When deploying a React application with serverless pre-rendering and static assets, it’s important to take care of the correct order of the deploy tasks to avoid any potential downtime.
The first Action in the Stage of deployment is to copy all static files created with create-react-app to the final S3 Bucket used with CloudFront. After all new static files are copied, the sources of the AWS Lambda function will be deployed using the generate CloudFormation templates. The last step to deploy the application is configuring the CloudFront CDN.

As soon as all three Actions have finished, it’s time to invalidate all outdated assets that may be stored in the cache of CloudFront. Done, your React SPA is now served using CloudFront and has serverless pre-rending! This guide is also available in German and you can access the deployed React application at d31tuk9nqnnpkk.cloudfront.net